.svg)

.svg)
.svg)

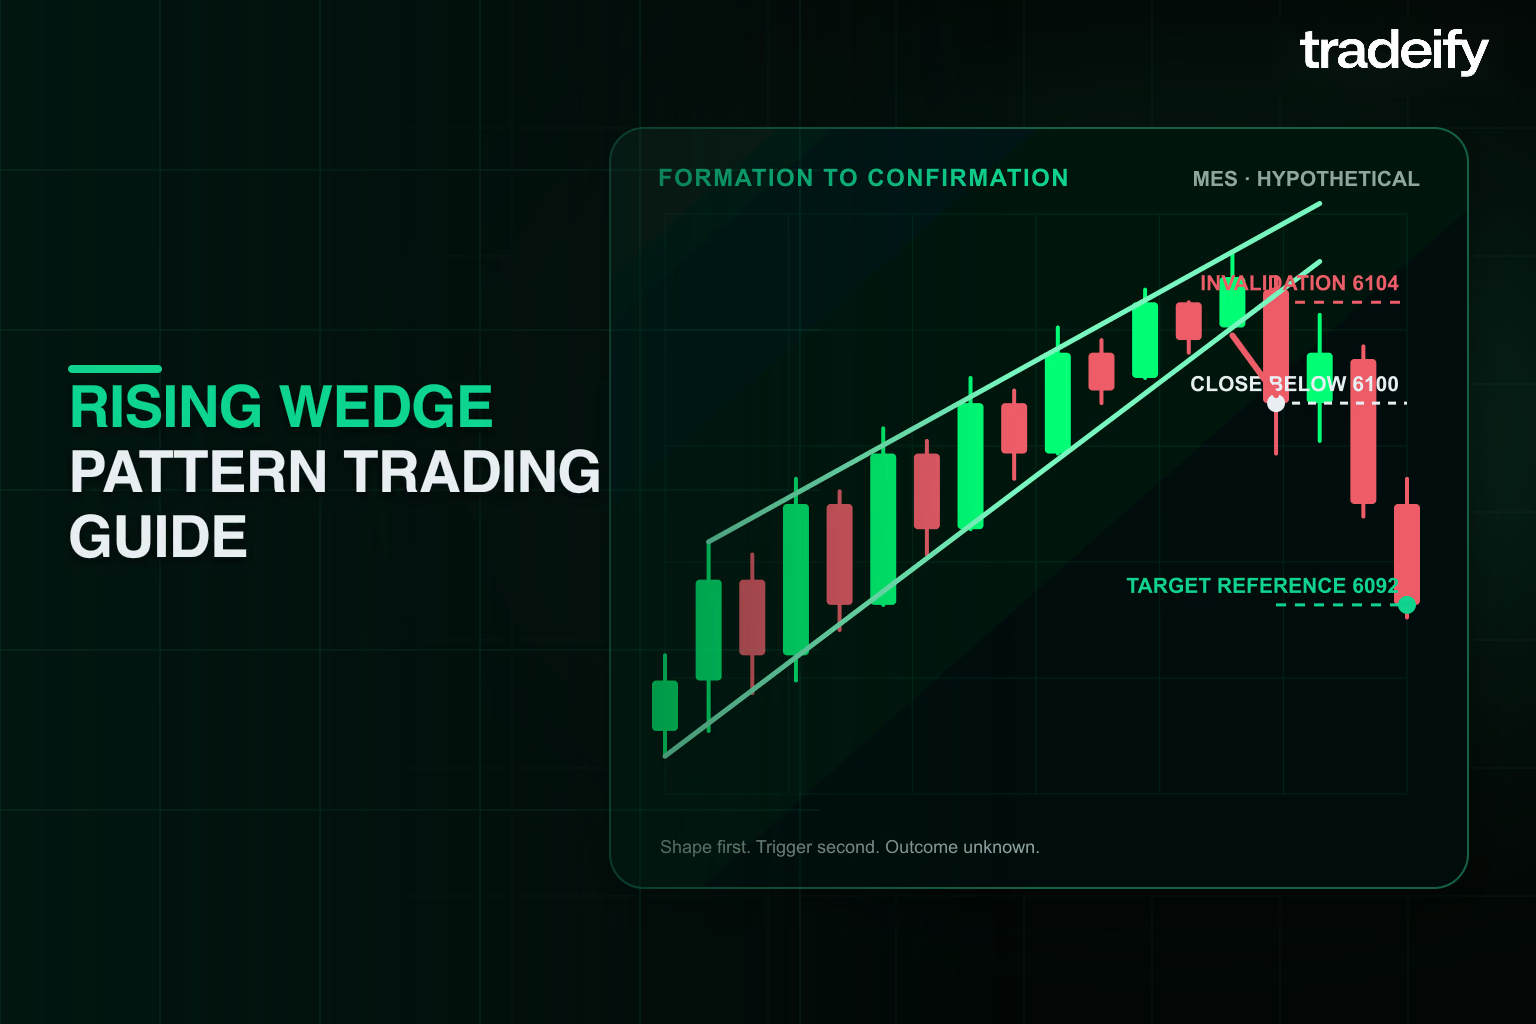


TL;DR: A rising wedge has two upward-sloping boundaries that converge because the lower line rises faster than the upper line. That shape creates a bearish hypothesis, not a confirmed short. Define the anchors before the break, choose how closes and wicks count, wait for your trigger, place invalidation beyond a structure that proves the idea wrong, size the futures position from stop distance and contract value, and test the same rules across every candidate. A downside target is a planning reference, not a promise. An upside break or a reclaimed breakdown invalidates the bearish setup but does not automatically create a long trade.
Rising Wedge Pattern Table of Contents
- What a rising wedge pattern is
- How to identify a rising wedge pattern
- Rising wedge pattern comparisons
- Rising wedge reversal and continuation contexts
- How to confirm a rising wedge breakdown
- Rising wedge entry methods
- Rising wedge targets and futures risk
- Complete rising wedge trading workflow
- Failed rising wedge setups and reasons to pass
- How to backtest a rising wedge pattern
- Rising wedge pattern FAQ
What a Rising Wedge Pattern Is
A rising wedge is a contracting price structure bounded by two lines that both slope upward. Price usually makes higher swing highs and higher swing lows inside the shape, but the lower boundary climbs faster than the upper boundary. The distance between the lines narrows as they approach a projected intersection called the apex.
That is the observable geometry. It does not tell you who bought, who sold, where other traders placed stops, or why volume changed.
Traders commonly interpret the narrowing structure as a loss of upside progress and build a bearish trade hypothesis around a possible break of the lower boundary. The hypothesis is reasonable to test. It is not confirmed while price remains inside the wedge.
This distinction matters because the internal trend is still up until your chosen support rule fails. A clean-looking wedge can continue rising, break upward, drift into the apex, or produce a brief downside break that immediately reclaims support.
Rising Wedge Pattern at a Glance
| Feature | Visual example | What is observable | What confirms the trade hypothesis | What invalidates it |
|---|---|---|---|---|
| Rising boundaries | Both trendlines slope upward | This identifies the shape only | A flat or falling boundary changes the pattern | |
| Convergence | The lower line rises faster than the upper line | The range contracts as planned | Roughly parallel lines describe a channel | |
| Breakdown | Price tests or crosses the lower boundary | The predefined close or structure rule triggers | Price closes back inside under the failure rule | |
| Upside failure | Price breaks the upper boundary or exceeds the structural high | No bearish confirmation remains | The short thesis is invalid, but a long still needs a separate setup |
How to Identify a Rising Wedge Pattern
Start with price, not a prediction. Mark the swings you could have identified at the time and ask whether the two boundaries describe the price action without forcing the lines.
Rising Wedge Boundaries and Anchors
A practical drawing process is:
- Mark at least two distinct swing highs and two distinct swing lows.
- Draw an upper line through the highs and a lower line through the lows.
- Confirm that both lines rise from left to right.
- Confirm that the lower line is steeper, so the boundaries converge.
- Check that most of the relevant price action fits the structure without repeated line adjustments.
Some references prefer five total reversals or three touches on one side. Others start with two anchors per boundary and use a later touch as validation. These are definition choices, not laws of the market. Choose one rule before testing and apply it consistently.
The pattern start is the first swing used by the two boundaries. The apex is the projected intersection of those lines. You do not need price to reach the apex. In fact, a structure that becomes too narrow may leave too little room between entry, invalidation, and nearby support.
Rising Wedge Wicks and Closes
Decide how you treat wicks before the setup forms. Three defensible methods are:
- Use wick extremes for every anchor and require a close beyond the boundary for confirmation.
- Use closing prices for both the boundaries and the breakout rule.
- Allow a documented tolerance, such as one tick or a fraction of average bar range, for intrabar overshoots.
Do not switch methods after seeing the result. If one inconvenient wick makes you redraw the line until the trade looks perfect, you are fitting the explanation to the outcome.
Rising Wedge Volume and Momentum
Falling volume during formation and expanding volume on a downside break are common practitioner heuristics. StockCharts describes those behaviors as ideal or supportive, not as geometry required for every wedge. Futures volume also changes by session, contract month, rollover, and event risk, so compare like periods rather than treating raw volume as a universal signal.
Momentum divergence can also be recorded as context. For example, price may print a higher high while RSI prints a lower high. That is observable. It still does not prove that a breakdown will occur.
If you use volume, RSI, MACD, structure, and a retest together, define each measurement. Several indicators may be different views of the same slowing price move. More filters do not automatically create an independent edge.
Rising Wedge Pattern Comparisons
Similar shapes can imply different tests because their boundary geometry differs.
| Pattern | Visual example | Boundary geometry | Observable difference | Directional treatment |
|---|---|---|---|---|
| Rising wedge | Both lines rise and converge | Lower boundary is steeper than upper boundary | Bearish hypothesis until confirmed or invalidated | |
| Rising channel | Both lines rise at roughly similar slopes | Width remains relatively stable | Trend structure, not a contraction by itself | |
| Ascending triangle | Upper boundary is flat or nearly flat | Higher lows press into horizontal resistance | Often treated as bullish, but either side can break | |
| Pennant | Small, short contraction after a sharp impulse | Both boundaries usually converge around a compact pause | Commonly tested as continuation in the prior direction | |
| Falling wedge | Both lines fall and converge | Upper boundary falls faster than lower boundary | Commonly treated as a bullish hypothesis |
Time alone does not settle the classification. A compact intraday wedge can still be a wedge if it meets your predefined geometry, while a longer structure can still be a channel if its lines do not converge.
Rising Wedge Reversal and Continuation Contexts
The same shape can appear in two bearish contexts.
Rising Wedge Reversal Context
After an advance, a rising wedge can frame a possible reversal. Price is still making higher highs and higher lows, but each rally covers less vertical distance. The bearish case begins only when your support rule fails.
The best context is one where the planned downside path is not immediately blocked by nearby support and resistance and where the stop can sit beyond a clear structural level. A wedge directly above a major support zone may offer poor reward relative to the invalidation distance.
Rising Wedge Continuation Context
During a broader decline, a rising wedge may form as a countertrend rally. The prior downtrend supports a continuation hypothesis, but it does not remove the need for confirmation. A rally can become a larger reversal or a rising channel instead.
For both contexts, record the prior trend using an objective rule. Examples include swing structure on the setup timeframe or price relative to a predefined higher-timeframe level. Avoid labels such as “weak rally” unless you define what weak means.
How to Confirm a Rising Wedge Breakdown
Confirmation is the event that turns a shape into a trade candidate. Your rule should use information available in real time.
Rising Wedge Formation Only
While price remains between the boundaries, the wedge is still forming. An anticipatory short near the upper boundary is a separate entry method with less confirmation. It should not be described as a confirmed breakdown trade.
Rising Wedge Close Below Support
A close below the lower boundary is a common trigger because it filters some intrabar probes. TradingView's documented auto-pattern logic also uses the close to register a breakout, but that is one transparent algorithm, not a universal standard.
You can make the rule stricter by requiring the close to break a prior swing low or exceed the boundary by a volatility or tick buffer. Stricter rules may reduce false signals, but they can also produce later entries and wider stops. Test the tradeoff.
Rising Wedge Retest
After a breakdown, price may return to the lower boundary from below. A retest entry waits for that area to reject, such as a bar that tests the line and closes back below it.
A retest is optional. It may never occur, and it may run far enough into the structure to invalidate the short thesis. Do not chase a missed breakdown because you expected a retest.
Rising Wedge Throwovers and False Breakdowns
A throwover is a brief move above the upper boundary that returns inside the wedge. A false breakdown is a move below support that quickly reclaims the line or the last internal swing.
Define which event matters in your plan: a wick, a close, a number of closes, or a structural swing break. If the bearish thesis fails, exit according to the planned invalidation. A failure does not automatically become a long entry. A long requires its own context, trigger, stop, size, and target.
Rising Wedge Entry Methods
There are three common entry choices. None is automatically best.
| Entry method | Visual example | Trigger | Main tradeoff | Stop and pass rule |
|---|---|---|---|---|
| Anticipatory boundary entry | Bearish rejection near the upper boundary before a breakdown | Earlier price and potentially smaller stop distance The internal uptrend remains intact | Beyond the rejection high or upper boundary. Pass when no precise rejection or poor space to target | |
| Breakdown close entry | A bar closes below the lower boundary under the predefined rule | Clearer evidence that support failed Fast breaks can create slippage or a late entry | Beyond the breakdown bar, last lower high, or reclaimed support rule. Pass when breakout bar is too extended for the risk budget | |
| Retest entry | Price retests broken support and closes back below it | More information and often a clear invalidation Retest may not happen or may fully reclaim the wedge | Beyond the retest high or structural reclaim. Pass when retest enters deep into the wedge or target space has shrunk |
If you backtest all three, keep their results separate. Combining them after the fact can hide which trigger actually produced the outcome.
Rising Wedge Targets and Futures Risk
Targets organize a plan. They do not forecast what price must do.
Rising Wedge Measured Move Target
One common technique measures the widest vertical height near the start of the wedge and projects that distance downward from the breakdown. Treat the result as a reference. StockCharts notes that other technical levels may be more useful because there is no universally reliable measuring technique for the decline.
Compare the projection with nearby swing lows, support zones, session levels, and the available reward relative to the stop. A nearer structural target may be more realistic. You can also scale out only if that rule was part of the test.
Rising Wedge Stop Placement
A structural stop belongs where the chosen setup is no longer valid, not at an arbitrary dollar amount. Depending on the entry, that may be above:
- the upper wedge boundary;
- the most recent swing high;
- the breakdown or retest bar high; or
- the price level that reclaims the broken support rule.
The dollar risk comes after the price risk. CME's position-sizing education uses the same sequence: define the logical stop, calculate risk per contract, then choose a contract count that fits the account risk limit.
Hypothetical MES Rising Wedge Example
Assume a five-minute Micro E-mini S&P 500 futures chart forms a rising wedge during a broader intraday decline. The example is hypothetical and excludes commissions, fees, and slippage.
- Price closes below wedge support at 6,100.
- The structural stop is 6,104, four index points above entry.
- CME lists MES at $5 per index point with a quarter-point tick worth $1.25.
- Price risk is 4 points × $5 = $20 per contract.
- Two contracts create $40 of price risk before costs.
- A nearby swing low at 6,092 is eight points below entry, or $40 per contract and $80 gross for two contracts if filled there.
If the remaining daily-loss budget is $65, two contracts leave limited room for slippage and fees. One contract or no trade may fit better. If the breakdown bar closes at 6,096 instead of 6,100, the trade is different. Recalculate the stop distance and target space rather than borrowing the earlier plan.
ES uses the same quarter-point minimum tick but a $50 point value, so one tick is $12.50. That tenfold difference is why the micro-versus-mini contract choice is part of risk management, not a cosmetic symbol change.
Stops can fill worse than the trigger price in fast conditions. The CFTC also warns that hypothetical results may omit spreads, execution differences, fees, liquidity constraints, and the difficulty of absorbing consecutive losses.
Complete Rising Wedge Trading Workflow
Use the same sequence every time:
- Define the prior trend and the setup timeframe.
- Draw both rising boundaries from anchors visible at the time.
- Confirm convergence and record how wicks, closes, and overshoots count.
- Label the chart as formation only until the chosen trigger occurs.
- Select one entry method and its structural invalidation.
- Calculate price risk, tick risk, dollar risk per contract, and contract count.
- Mark the measured-move reference and nearer structural targets.
- Check event risk, likely slippage, remaining daily-loss capacity, and drawdown rules.
- Take the setup only if the reward path and risk budget still fit.
- Record the result, including candidates that never triggered or failed.
The sequence is designed to prevent one common mistake: deciding that a wedge “worked” and then inventing the entry, stop, and target after seeing the chart.
Failed Rising Wedge Setups and Reasons to Pass
A valid setup can lose. The goal is to define that loss before it happens.
Pass or stand aside when:
- the boundaries do not both rise and converge;
- anchors change each time a new candle appears;
- the wedge is so narrow that normal price movement crosses both lines;
- price is already at the projected apex with little room to the target;
- the breakout candle makes the structural stop too large for the risk budget;
- nearby support leaves poor reward relative to risk;
- a scheduled event can change liquidity or slippage beyond what the test covers;
- the remaining daily-loss or drawdown limit cannot absorb the planned loss and costs; or
- the only reason for entry is fear of missing a move already underway.
Common review errors include drawing only successful wedges, choosing anchors with hindsight, ignoring upward breaks, excluding setups that never retested, and testing one pattern definition across multiple markets without accounting for session or contract differences.
How to Backtest a Rising Wedge Pattern
The PAA results repeatedly ask for a success rate. A useful answer starts with a definition, not a borrowed percentage.
Before testing, write down:
- market and continuous-contract construction;
- timeframe and trading session;
- swing or pivot definition;
- minimum anchors and allowed trendline error;
- wick, close, and throwover treatment;
- prior-trend rule;
- confirmation rule;
- entry price and fill assumption;
- stop and invalidation rule;
- target and partial-exit rule;
- commissions, fees, spread, and slippage;
- treatment of news, rollover, and overnight gaps; and
- maximum number of overlapping candidates.
Record every pattern candidate that met the rules before the outcome was known. Keep reversal and continuation contexts separate. Keep anticipatory, breakdown-close, and retest entries separate. Report the number of candidates, win rate, average win, average loss, expectancy, maximum adverse excursion, drawdown, and sensitivity to fees and slippage.
Use an out-of-sample period or walk-forward process after defining the rule. A small sample may be useful for finding coding or labeling errors, but it is not enough to support a durable performance claim. See the Tradeify guide on how many trades to backtest for sample-planning considerations.
Thomas Bulkowski's published rising-wedge summary is useful evidence that definitions and breakout direction matter. It reports stock-pattern outcomes with different figures for upward and downward breaks. The complete sample, timeframe, and test rules required for an intraday futures claim are not available in the accessible summary, so this guide does not convert those numbers into a universal wedge win rate.
Rising Wedge Pattern FAQ
Is a Rising Wedge Pattern Always Bearish
No. The shape supports a bearish hypothesis, but price can remain inside the wedge, break upward, or break down and reclaim support. A bearish trade needs a defined trigger and invalidation.
Can a Rising Wedge Pattern Be a Continuation
Yes. A rising wedge can form as a countertrend rally during a broader decline. It can also form after an advance as a reversal candidate. Prior context changes the hypothesis, not the need for confirmation.
Does Rising Wedge Volume Have to Decline
No. Declining volume is a common supporting observation, but it is not part of the boundary geometry. Futures volume varies by session and contract cycle. If volume is a filter, define and test the comparison.
What Is the Best Rising Wedge Timeframe
There is no universal best timeframe. Use one that provides enough swings to define the boundaries and enough liquidity for the execution assumptions in your test. Do not assume a rule tested on daily stocks transfers to five-minute futures.
What Confirms a Rising Wedge Breakdown
A close below the lower boundary is a common starting rule. Some traders also require a break of the prior swing low or a retest rejection. Each extra condition changes entry timing and should be tested separately.
What Is a Rising Wedge Pattern Target
The widest-height projection is a common planning reference. Nearby swing lows and support may be more relevant. No target is guaranteed to trade or fill.
What Does an Upside Rising Wedge Break Mean
It invalidates a bearish setup under most rule sets. It does not automatically create a long trade. A long needs separate context, confirmation, risk, and target rules.
Rising Wedge Pattern Final Checklist
Before taking a rising wedge trade, confirm that you can answer seven questions: What is observable? What is inferred? What triggers the entry? What invalidates the idea? What is the dollar risk per contract? Where is the first realistic target? What makes you pass?
If any answer depends on knowing what happened next, the setup is not yet defined well enough to test.
Futures and leveraged trading involve substantial risk and are not suitable for every trader. Stops may execute at worse prices than expected, and simulated or hypothetical examples do not reproduce actual market conditions. This article is educational and is not financial advice or a guarantee of performance.
.svg)
.svg)
.svg)
.svg)








.webp)