.svg)

.svg)
.svg)




TL;DR: Improve stop loss placement by putting the stop beyond the price level that invalidates the trade, adding a small volatility buffer, and reducing position size to keep dollar risk fixed. Do not choose the stop distance from a preferred contract size or an arbitrary loss amount. Before entry, confirm the target still offers acceptable reward relative to risk. After every 20 to 30 trades, classify each stop-out as a valid exit, a noise exit, or an execution problem, then adjust one rule at a time.
Table of Contents
- Why stop loss placement should follow trade invalidation
- A repeatable stop loss placement process
- Stop placement methods compared
- How to diagnose poor stop loss placement
- Common stop loss placement mistakes
- A stop loss placement example
- How to test stop loss placement
- Stop loss placement questions
Table of contents
- Why stop loss placement should follow trade invalidation
- A repeatable stop loss placement process
- Stop placement methods compared
- How to diagnose poor stop loss placement
- Common stop loss placement mistakes
- A stop loss placement example
- How to test stop loss placement
- Stop loss placement questions
Stop losses are supposed to define when a trade idea is wrong. In practice, many traders place them where the potential loss feels comfortable, where a round number looks convenient, or where the platform's default bracket order puts them. Those choices reverse the proper sequence. The chart should determine the stop distance, and the stop distance should determine the position size.
Better placement does not mean finding a stop that never gets hit. A good stop should be hit when the market has supplied enough evidence that the original setup no longer deserves capital. Some valid trades will still stop out and reverse. The goal is to reduce avoidable exits without turning every normal loss into a much larger one.
Why stop loss placement should follow trade invalidation
Every trade needs a condition that would disprove its premise. For a long trade based on a higher low, that condition may be a clean break below the swing low. For a breakout, it may be acceptance back inside the prior range. For a mean-reversion setup, it may be continued expansion away from the reference level instead of the expected rejection.
That invalidation point is the starting point for stop loss placement. The stop normally belongs beyond it, with enough room for ordinary price noise, spread, and brief tests of the level. Placing the order directly on an obvious swing high, swing low, or round number can expose it to routine probing even when the broader setup remains intact.
This distinction also separates trade risk from position size. If the technically sound stop is 12 ticks away, the answer is not to squeeze it to six ticks so the trader can keep the same number of contracts. The answer is to calculate how many contracts fit the allowed dollar risk at 12 ticks. If the smallest available position is still too large, the trade does not fit the risk plan.
A repeatable stop loss placement process
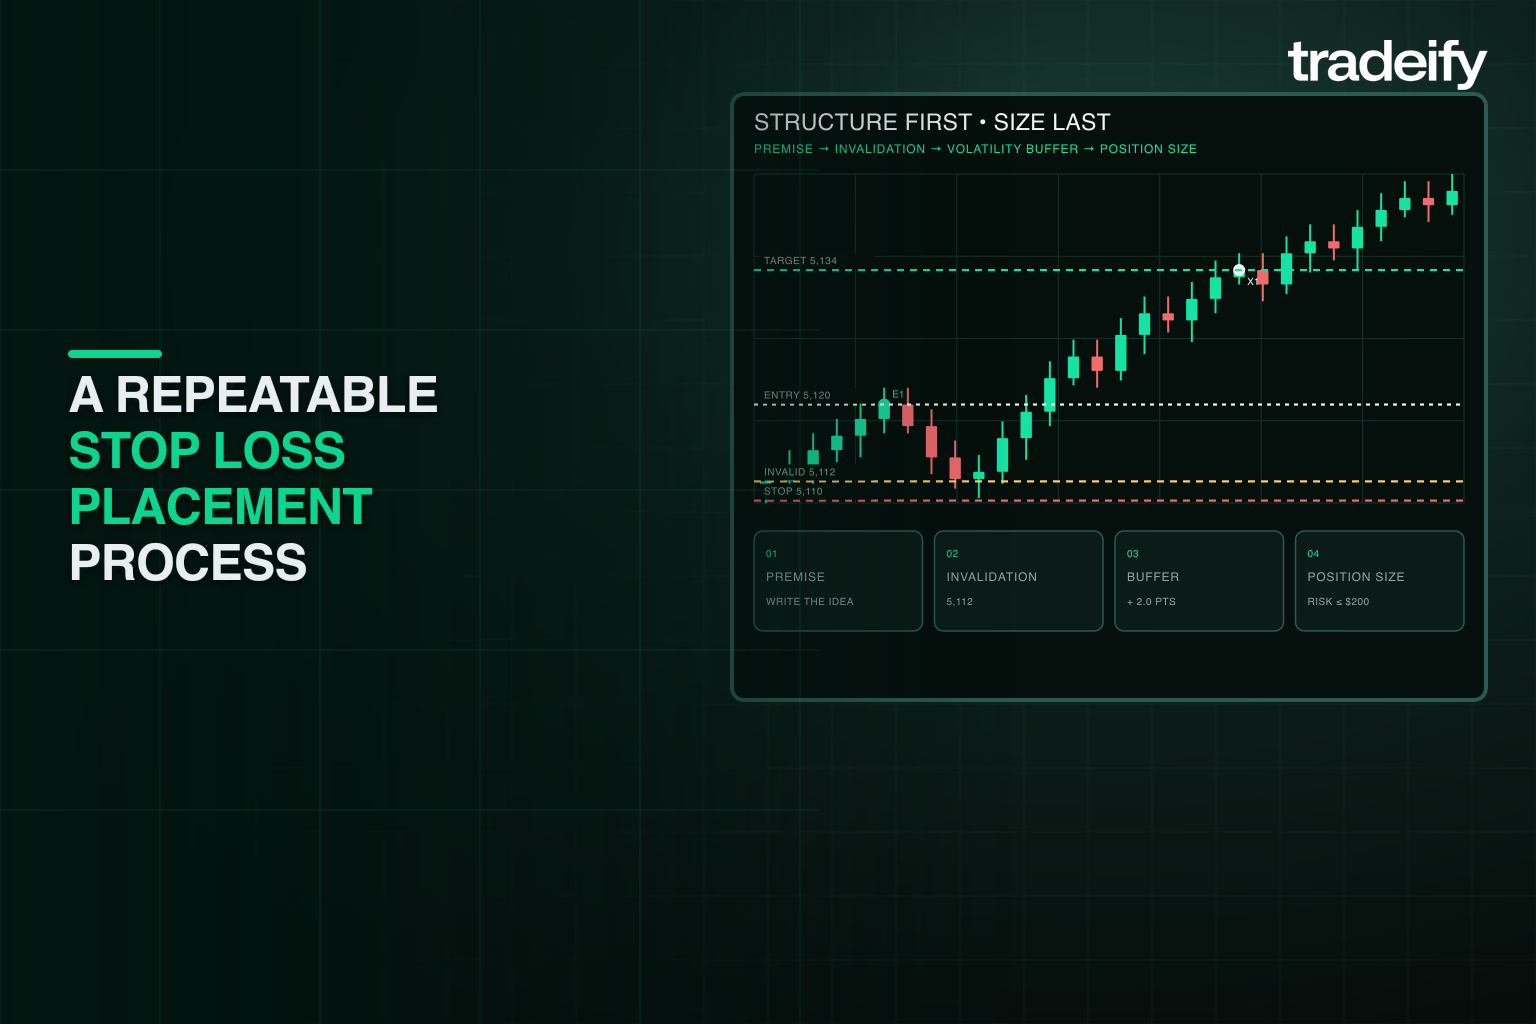
The same process can be used for futures, stocks, forex, and other liquid markets. The exact values change by instrument and timeframe, but the order of decisions stays consistent.
Define the stop loss invalidation level
Write the trade premise in one sentence before entry. Then identify the price action that would make that sentence false. Useful reference points include:
- The swing low beneath a long setup or the swing high above a short setup
- The opposite side of a support, resistance, supply, or demand zone
- The low or high of the signal candle when the setup depends on that candle holding
- The edge of a prior range after a breakout
- A volume-weighted average price or moving average when the strategy has tested rules for that reference
The reference must belong to the setup. A nearby level is not automatically a valid level.
Add a volatility buffer to the stop
Markets rarely turn at an exact tick. A buffer puts the order beyond the invalidation point instead of directly on it. The buffer can be expressed as ticks, a fraction of Average True Range, or a share of the setup candle's range.
For example, a trader might place a long stop below a swing low by one-quarter to one-half ATR rather than at the swing low itself. The multiplier is not universal. A fast instrument around a major economic release may require more room than the same instrument during a quiet session. The chosen buffer should come from testing, not from a single winning chart.
ATR is useful because it adapts as typical range expands or contracts. It does not know whether a chart level is meaningful, so it works best as a buffer around structure, not as a substitute for the trade premise.
Size the trade from the stop distance
Once the entry and stop are known, calculate the risk per unit:
Risk per unit = Stop distance × Value per point or tick
Then calculate the position size:
Position size = Maximum trade risk ÷ Risk per unit
Always round down to the nearest tradable unit. Include expected commissions and a reasonable slippage allowance when those costs matter. This keeps risk stable even when one setup needs a wider stop than another.
Check the trade target against stop risk
A technically valid stop can still make the trade unattractive. Compare the distance to the logical target with the full distance to the stop. If the next resistance level leaves little room for a long trade, widening the stop may destroy the trade's reward-to-risk profile.
Do not pull the stop closer simply to manufacture a better ratio. Either improve the entry, choose a different target supported by the setup, reduce the size, or skip the trade. The stop protects the premise; the target and entry determine whether the opportunity is worth taking.
Place the stop when the trade opens
Whenever the platform supports it, use a bracket order or another preset order workflow that sends the protective stop with the entry. Confirm the order quantity, order type, price, and contract before transmitting it. This reduces the chance that hesitation or a fast move leaves the position unprotected.
A stop order usually becomes a market order when triggered, so the fill can be worse than the stop price during gaps or fast trading. A stop-limit order controls the acceptable price but may not fill at all. Traders should understand how their broker and market handle each order type before relying on it.
Stop placement methods compared
No single method is best for every setup. The strongest choice is the one tied to a defined strategy and tested on the instrument and session being traded.
Stop placement method | Best use | Main strength | Main weakness |
|---|---|---|---|
Market structure | Breakouts, pullbacks, and reversal patterns | Connects the exit to trade invalidation | Obvious levels may need a buffer |
ATR or volatility | Instruments whose range changes over time | Adapts to current movement | Can ignore meaningful chart levels |
Fixed percentage | Longer-term stock systems | Simple and consistent | Treats quiet and volatile assets alike |
Moving average | Tested trend-following systems | Adjusts as the trend develops | Can lag or cause repeated exits in sideways trade |
Trailing stop | Open-profit management | Allows participation in extended moves | Can return profit or exit on normal pullbacks |
Time stop | Setups expected to work quickly | Frees capital when the premise stalls | Price may move after the time limit |
A hybrid structure-and-volatility method is often easier to reason about than an arbitrary fixed distance. Structure answers where the idea is wrong. Volatility helps decide how much room the order needs beyond that point.
How to diagnose poor stop loss placement
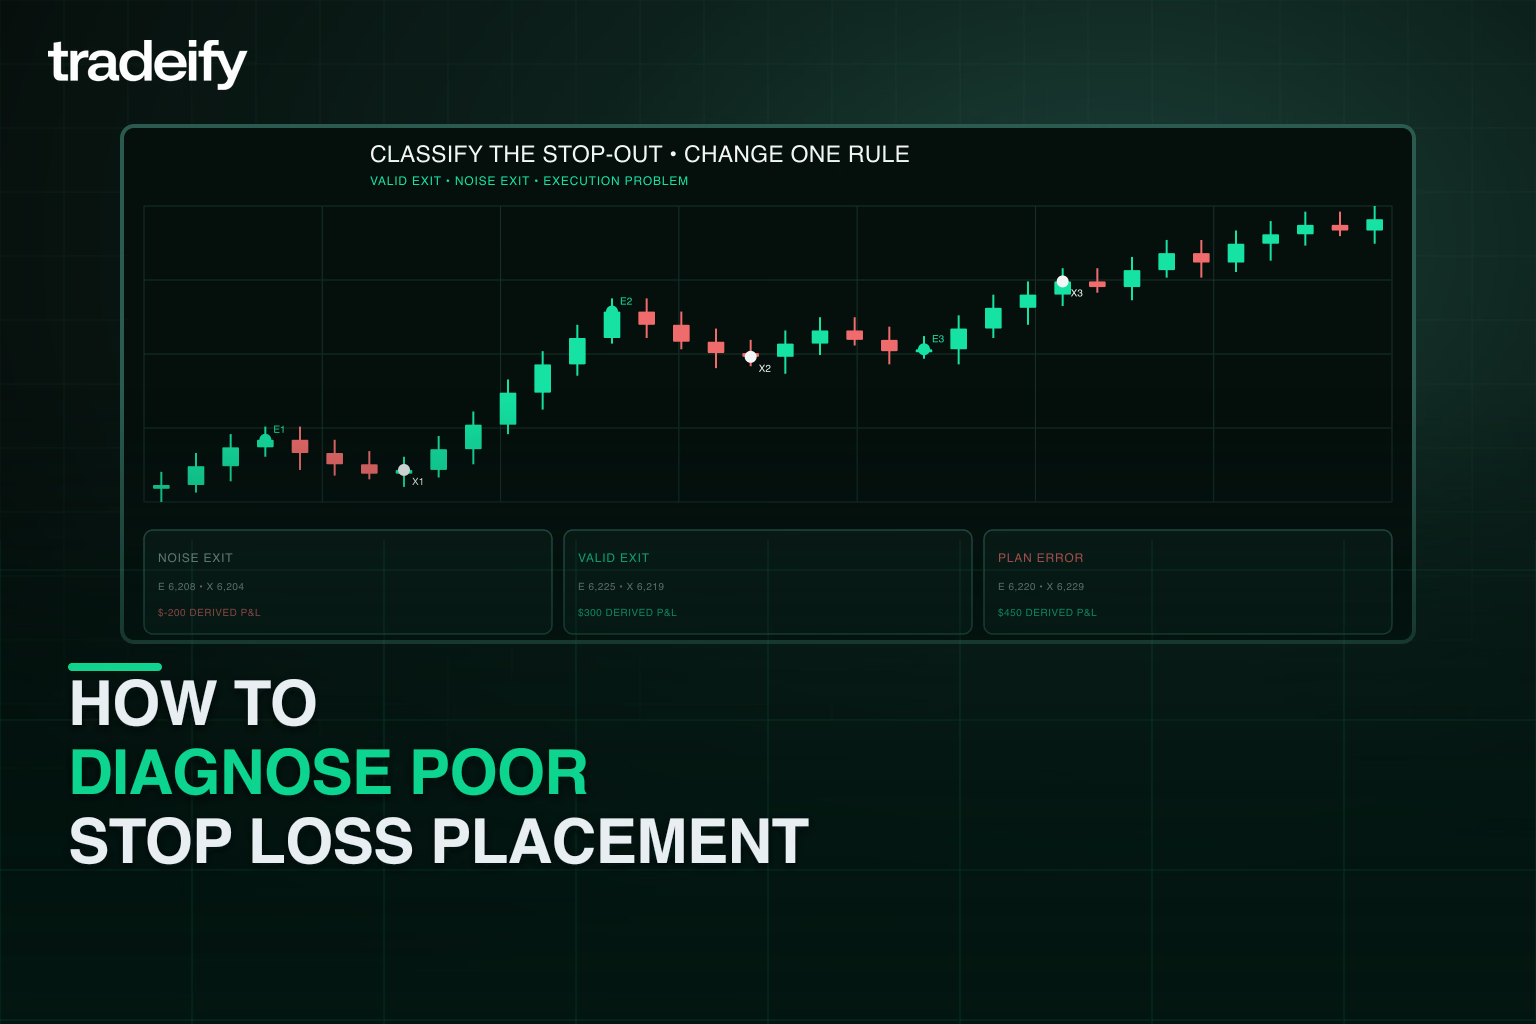
One stopped trade reveals very little. A group of comparable trades can show whether placement is too tight, too wide, or simply inconsistent.
Track price action after a stop loss
Record the maximum adverse excursion before winning trades and the movement after losing trades. Screenshots taken at entry, exit, and several bars after exit make the review easier. Classify each stopped trade into one of three groups:
- Valid exit: Price crossed the invalidation level and continued against the trade.
- Noise exit: Price clipped the stop, held the broader premise, and then traveled toward the original target.
- Execution problem: The stop, size, symbol, or order type did not match the written plan.
If valid exits dominate, the stop may be doing its job even when the win rate feels uncomfortable. If noise exits repeat around the same setup, test a modest buffer and reduce size so dollar risk does not rise. If execution problems recur, fix the order workflow before changing the strategy.
Separate placement from entry quality
Repeated noise exits can also signal late entries. Chasing a move often leaves the entry far from the invalidation point, which creates a choice between an oversized stop and an artificially tight one. A better entry near the planned level can improve the reward-to-risk profile without changing the stop logic.
Review entry timing, stop placement, and trade selection as separate variables. Changing all three at once makes it hard to know what caused the result.
Compare stop loss results by setup and condition
Group trades by setup, instrument, session, volatility regime, and direction. A stop rule that works during a steady trend may fail during an opening-range expansion. A five-minute setup may require different room from the same pattern on a one-hour chart.
Use median outcomes instead of letting one extreme move dictate the rule. The aim is a method that performs acceptably across a meaningful sample, not a distance that would have saved the latest losing trade.
Common stop loss placement mistakes
Choosing the stop loss after trade size
Starting with a preferred contract or share count encourages traders to force the stop into the remaining risk budget. Reverse the sequence: entry, invalidation, buffer, risk per unit, then size.
Putting stop losses on obvious price levels
An order directly at a prior high, low, or round number can sit inside normal testing of that area. A tested buffer may reduce these exits, but it should not become an excuse for unlimited room.
Moving the stop loss farther after entry
Widening a stop because price is close to triggering it increases risk after the market has moved against the trade. If new information truly changes the setup, exit and reassess rather than quietly rewriting the original risk.
Moving the stop loss to break-even without a rule
Break-even is meaningful to the trader, not to the market. Moving the stop to entry too early can cut trades during ordinary pullbacks. If a strategy uses break-even stops, define the trigger in advance, such as a structure break, a tested R-multiple, or a volatility contraction.
Using the same stop distance in every market
A fixed eight-tick stop behaves very differently across instruments and across quiet and volatile sessions. Normalize placement with structure, range, or both, then recalculate size.
Treating every stop-out as a mistake
Losses are part of any trading method. A stop that exits a genuinely invalid setup is successful risk control, even if the next trade also loses. Judge placement by rule adherence and a sample of outcomes, not by whether one trade was profitable.
A stop loss placement example
Assume a trader plans a long futures trade at 5,102 after a pullback forms a higher low at 5,098. The setup is invalid below that higher low. Current ATR is 12 ticks, and the trader's tested rule adds a six-tick buffer.
- Structural level: 5,098
- Volatility buffer: 6 ticks
- Stop price: 5,096½
- Entry price: 5,102
- Total stop distance: 22 ticks
If one contract risks $12½ per tick, the risk is $275 before commissions and slippage. A trader with a $150 maximum risk cannot take one full-size contract under this plan. The disciplined choices are to use a smaller contract if available, wait for an entry closer to the level, or pass. Moving the stop to 5,099 solely to fit the budget would place it above the true invalidation point and change the setup.
The example shows why placement and sizing cannot be separated. A wider stop does not have to mean greater account risk when the position can be reduced.
How to test stop loss placement
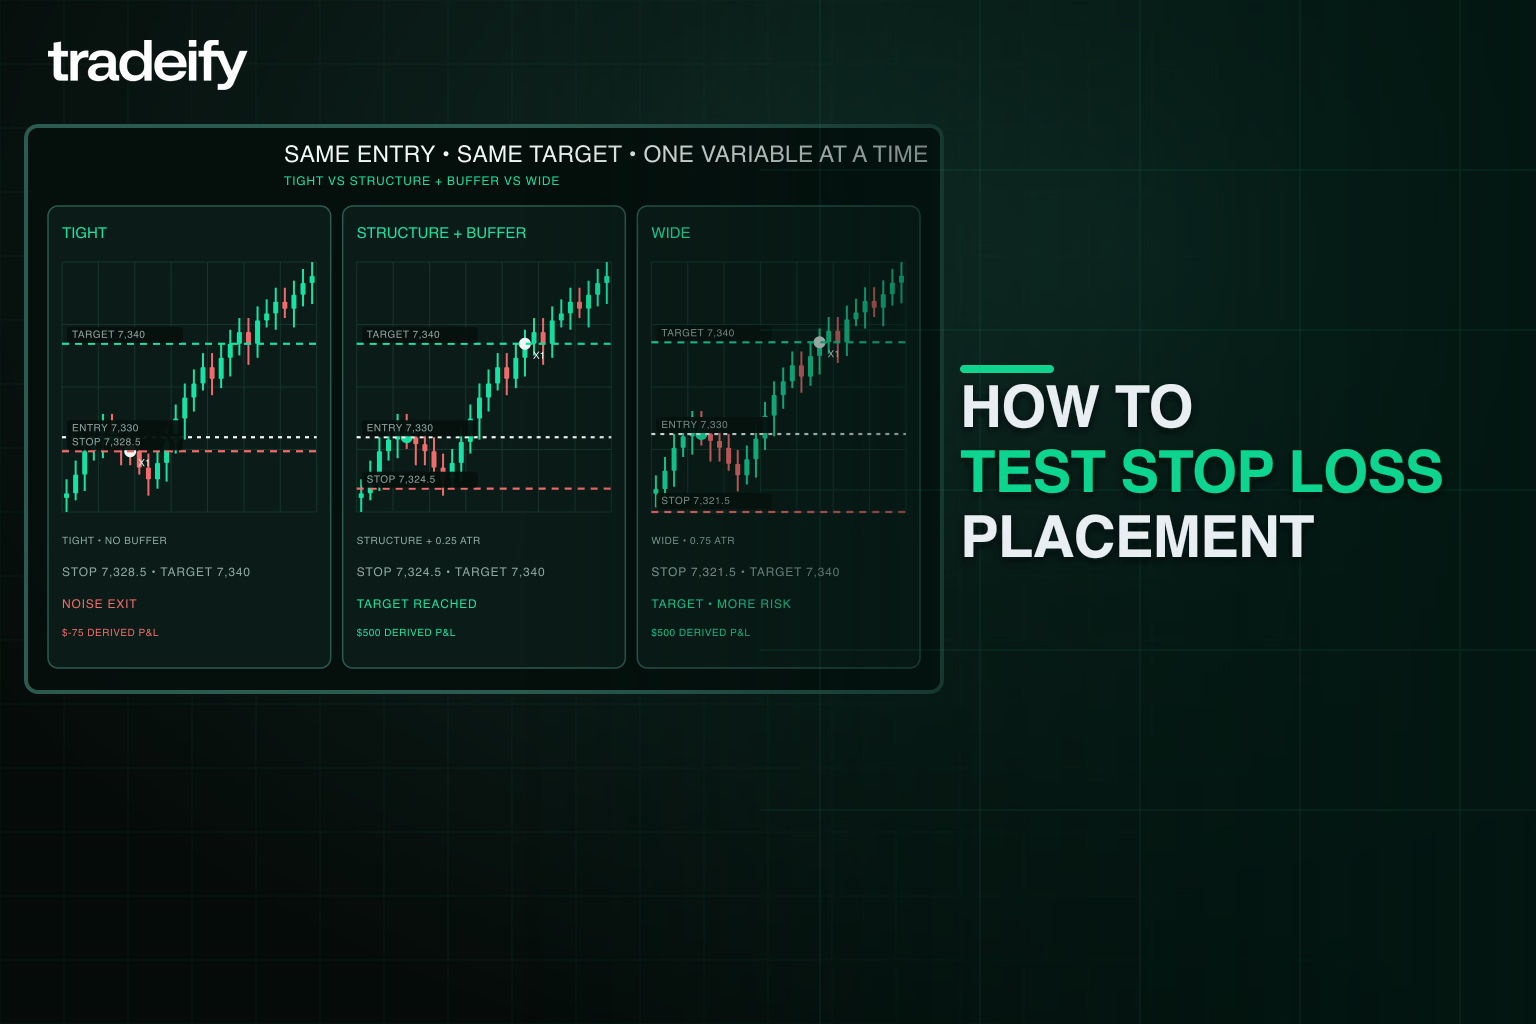
Use a sample of at least 20 to 30 trades from one clearly defined setup before drawing conclusions. More data is better when the setup occurs often enough. Record:
- Planned entry, stop, target, and position size
- The structural invalidation level and buffer method
- ATR or another volatility measure at entry
- Maximum adverse and favorable excursion
- Whether the stop was followed exactly
- Whether price reached the original target after the stop
- Commissions, slippage, and net result in R
Compare the current rule with one or two alternatives. For example, test structure alone against structure plus one-quarter ATR and structure plus one-half ATR. Keep the same entry and target rules. Evaluate expectancy, average loss, win rate, drawdown, and how often each version exits on noise.
Change one variable at a time and test the revised rule on fresh trades or an out-of-sample period. A wider stop may improve the win rate while lowering the average R-multiple. A tighter stop may produce more losses but better overall expectancy. The best rule is the one that improves the full distribution of results while staying within the trader's risk limits.
Stop loss placement questions
What is the best stop loss position
The best stop is beyond the price level that invalidates the specific trade, with enough room for typical volatility and execution noise. There is no universal tick, point, or percentage distance that works for every setup.
What is the 7 percent stop loss rule
The 7 percent rule is a fixed-percentage approach commonly discussed for stock positions. It exits when price falls roughly 7 percent from a reference price. It can impose discipline, but it does not adapt to each stock's volatility or chart structure and is not a universal standard.
What are common stop loss mistakes
Common mistakes include placing the stop from a preferred dollar loss instead of invalidation, using the same distance in every condition, putting it directly on an obvious level, widening it after entry, and moving it to break-even without a tested trigger.
Should a stop loss be based on ATR
ATR can help scale the stop to current volatility. It is usually more useful as a buffer beyond a structural level than as a standalone distance from the entry. Test the ATR period and multiplier for the specific instrument, timeframe, and setup.
When should a trader move a stop
Move a stop only when a written management rule is triggered. Examples include a confirmed structure change, a tested profit threshold, or a trailing method used consistently in prior testing. Do not move it simply because open profit feels uncomfortable.
Stop loss placement improves when every decision has a job. Structure defines invalidation, volatility supplies breathing room, position size controls account risk, and the trade review supplies evidence for the next adjustment. Follow that sequence consistently, and stop-outs become data instead of reasons to improvise.
.svg)
.svg)
.svg)
.svg)








.webp)